
Page Introduction
Welcome to PixPretty!
PixPretty is dedicated to providing intelligent imaging solutions for commercial photography. It analyzes every photo with precision to achieve studio-grade post-processing results. Through continuous R&D investment and the accumulation of aesthetic data, we ensure that every visual output embodies both advanced AI technology and refined human aesthetics.
The desktop version is currently available for Windows only.
How to Log in PixPretty?

- Step 1:Account Input Field: Enter the email you used to register PixPretty here.
-
Step 2:Password Input Field: Enter the password you used to register PixPretty to log in. If you forgot your password, click "Forgot your password? below to reset it.


Project Page Overview
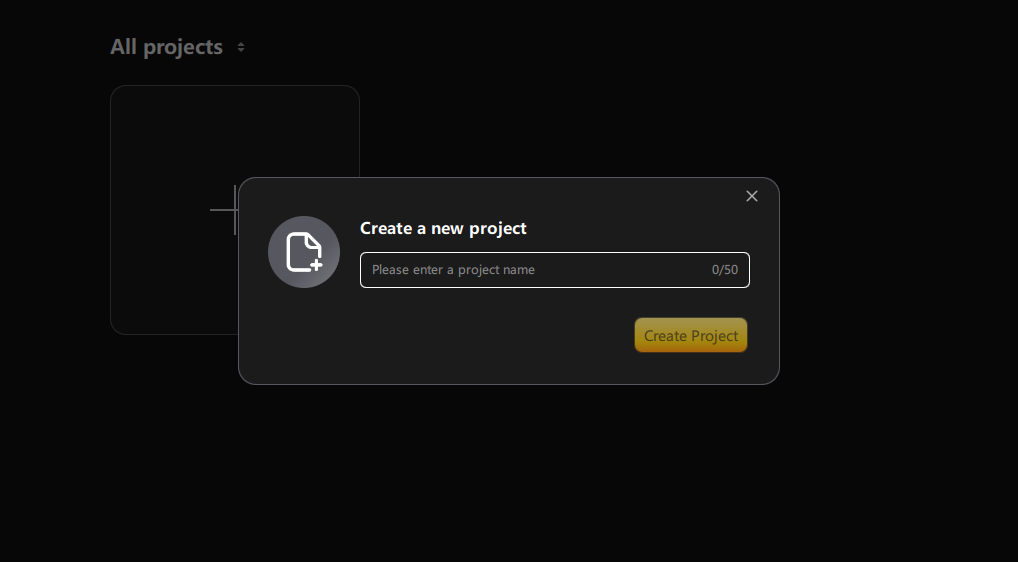
1. All Projects: Includes creating new projects and managing local ones.
- Create New Project: Click the "+" icon to create a new project.
- Local Projects: View and select all projects created on this device.
- Project Sorting: Sort projects by last opened time, creation time, update time, or name. After selecting a sorting rule, you can choose to display in ascending or descending order.
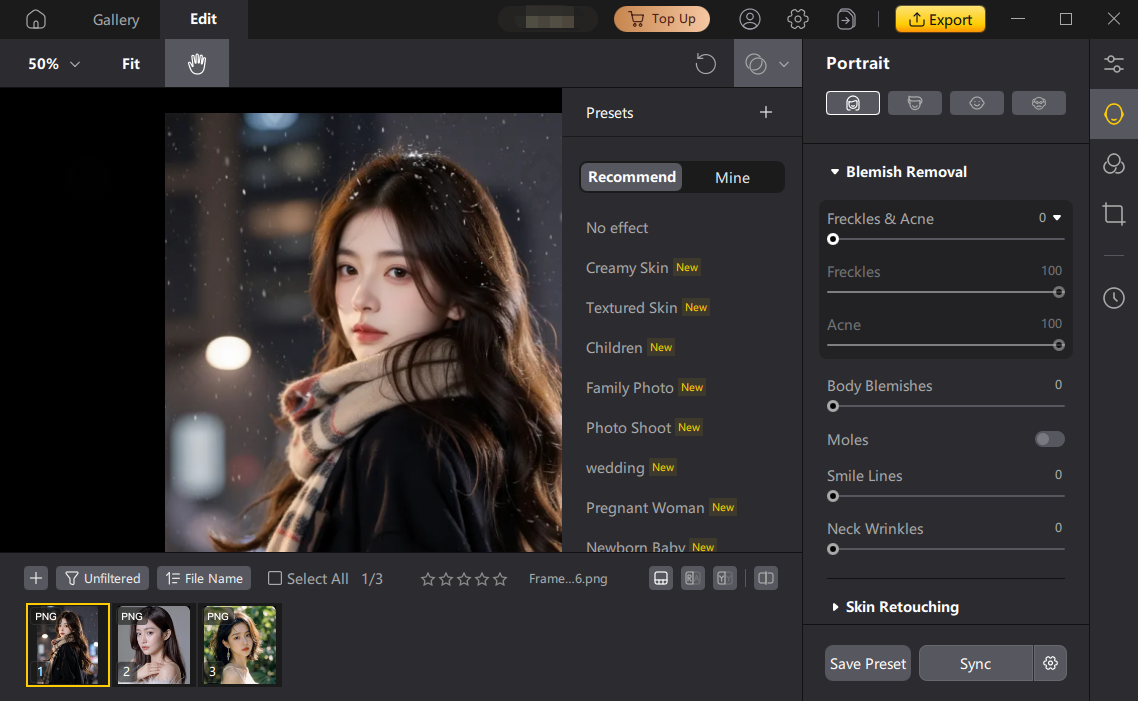
Retouching Page
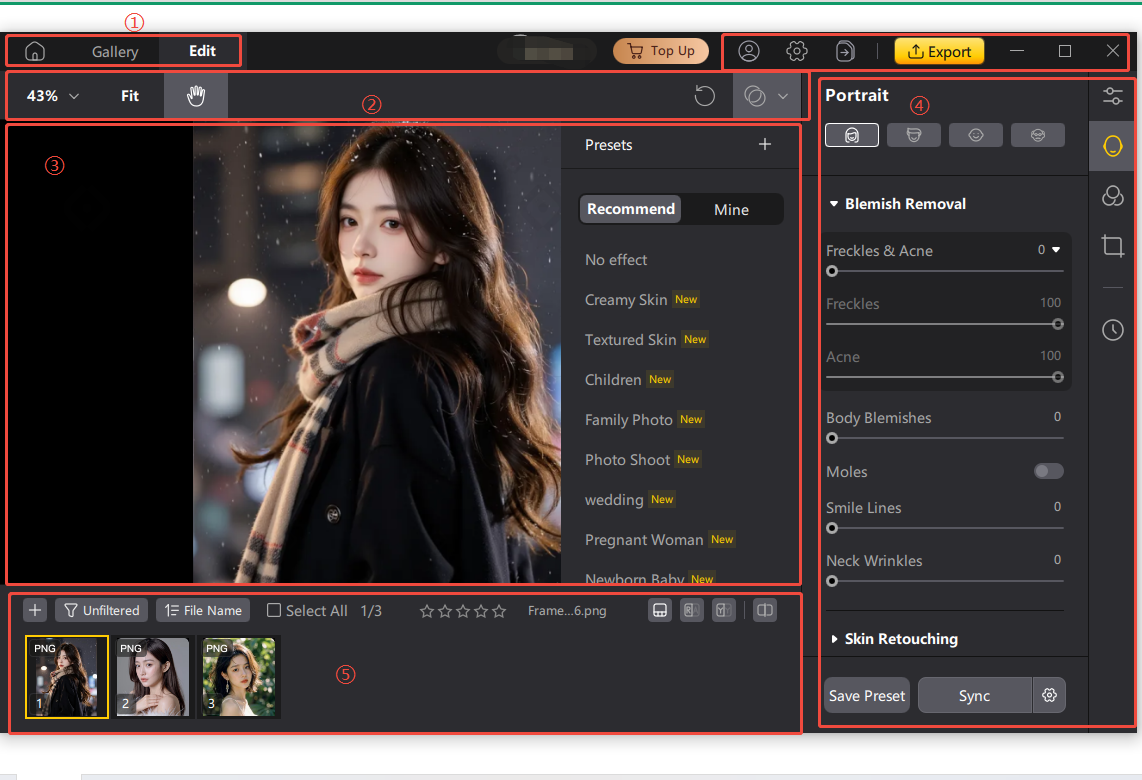
- Zoom Ratio Adjustment: Click the number in the top-left corner to select a suitable zoom level. Click the "Fit" button on the right to quickly adjust the image to the optimal display size.
- Dragging: This function is enabled by default upon entering the retouching page. You can freely drag and zoom the image within the preview area.
- Presets: Use and manage your presets here. For detailed instructions, see: Create New Preset, Import Preset, and Manage Presets.
Video: How to Retouch Portraits with PixPretty?
2. Toolbar: Includes zoom ratio adjustment, drag tool, and presets.
3. Image Preview Area: Preview your retouched images in this area. Click the "Compare Views" button in the bottom-right corner to see a before-and-after comparison.
4. Personal Panel: Includes purchase plans, live support, user center, export list, and export options.
- Purchase Plan: Click here to enter the subscription plan purchase page.
- Live Support: Click here to access live customer support. Contact a support agent if you need help while using the software.
- Support Center: Check remaining image credits, update the software, or log out from your account. For details, see: User Center Settings.
- Export Queue: View tasks that are currently exporting or have already been completed.
- Export: Once your image retouching is complete, click this button to export the final result.
5. Thumbnail Panel: View all thumbnails within the current project. Click the "+" icon to add more images, use the filter button to filter images by specific rules, or the sort button to arrange them accordingly. You can also mark images using star ratings.
6. Function Panel: Switch between different feature modules and access sub-tools within each module in this area.
Gallery Page Overview
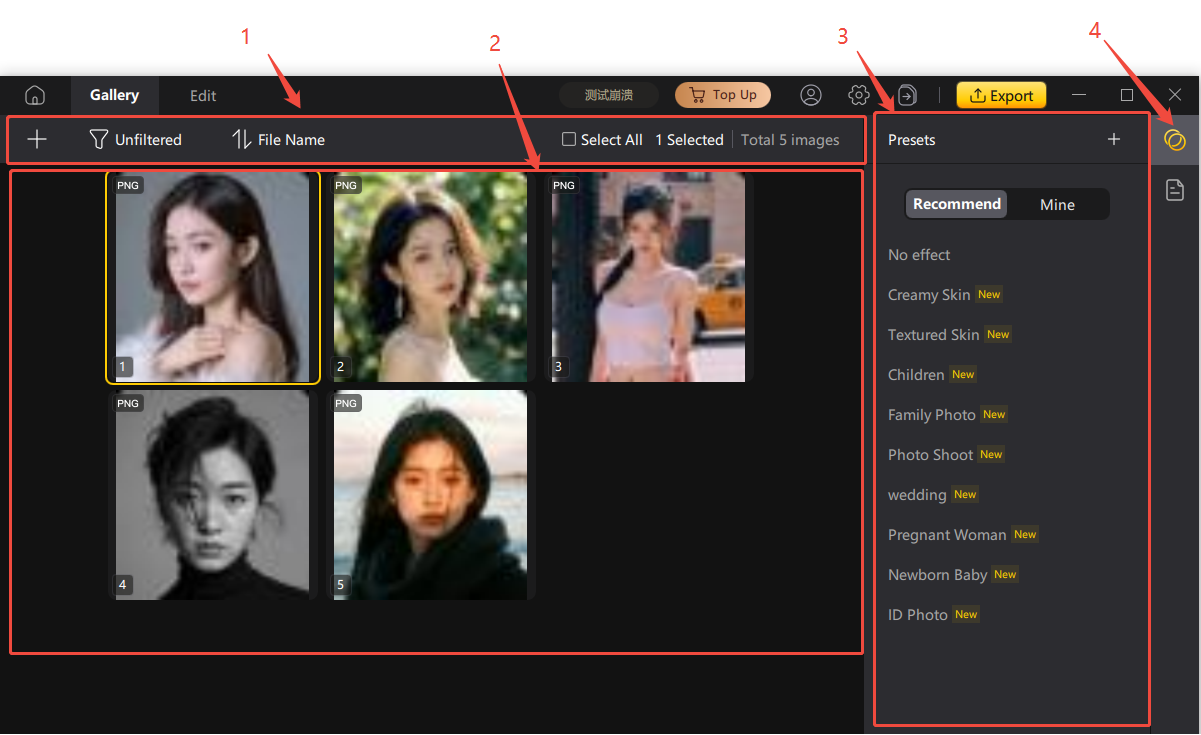
1. Toolbar: Includes image import, sorting options, display settings, and an overview of the number of selected images and the total number of images in the current project.
- The filter feature supports four criteria: "Star Rating," "Retouching Status," "Export Status," and "Image Format." These filters can be used in combination.
- Sorting options include "Capture Time," "Edit Time," "Star Rating," "File Type," and "Filename." Each option supports both ascending and descending order.
- Display settings include "Show RAW Files," "Show Retouching Status," and "Show Export Status."
- Export status includes two types: "Exported" and "Not Exported."
- Image formats include "JPEG Format," "RAW Format," and "Other Formats."
2. Thumbnail Area: This section displays all thumbnails within your current project. Each image can have up to four different tags: a "RAW" tag at the top-right corner, an "Exported" tag, an "Edited" tag at the top-left corner, and a "Star" tag below. When a star tag is assigned, the thumbnail frame background will change to the corresponding color. You can quickly tag selected images using the "Star" tag option below each thumbnail.
3. Metadata: Displays metadata information for the currently selected image.
4. Presets: Use and manage your presets here.
Blemish Removal
Based on the principle of neutral gray, this feature thoroughly removes facial spots and acne marks, achieving a natural, realistic, and seamless finish.
Presets
1. Preset Types: Color Presets, Portrait Presets, and Combined Presets.
2. Portrait: Presets that use only the portrait beautification module.
3. Color: Presets that use only the color adjustment module.
4. Combined: Presets that combine multiple modules (portrait beautification, color adjustment, filters).
Video: How to PixPretty Presets?
Preset Overriding and Stacking
When applying multiple presets of the same type on a single photo (or applying a single-type preset followed by a combined preset), the final effect will be determined by the last preset applied. When applying presets of different types repeatedly, the final effect will be a combination of all presets applied.
Example: If you first apply a portrait-type “Texture Skin” preset, then apply a “Creamy Skin” preset, the effects from the “Texture Skin” preset will be overridden and only the “Creamy Skin” effect will be active. However, if you apply the “Texture Skin” preset followed by a color-type “Film - Blue Ice” preset, the effects of both presets will be stacked and combined.
Example: If you first apply a portrait-type “Texture Skin” preset, then apply a “Creamy Skin” preset, the effects from the “Texture Skin” preset will be overridden and only the “Creamy Skin” effect will be active. However, if you apply the “Texture Skin” preset followed by a color-type “Film - Blue Ice” preset, the effects of both presets will be stacked and combined.
Batch Apply Effects to Other Photos
-
Method 1
When applying multiple presets of the same type on a single photo (or applying a single-type preset followed by a combined preset), the final effect will be determined by the last preset applied. When applying presets of different types repeatedly, the final effect will be a combination of all presets applied.
Example: If you first apply a portrait-type “Texture Skin” preset, then apply a “Creamy Skin” preset, the effects from the “Texture Skin” preset will be overridden and only the “Creamy Skin” effect will be active. However, if you apply the “Texture Skin” preset followed by a color-type “Film - Blue Ice” preset, the effects of both presets will be stacked and combined. -
Method 2
After finishing edits on a single photo, use the shortcut Control + C / Command + C to copy the adjustment settings. Then press Control + A / Command + A to select all photos, and finally use Control + V / Command + V to paste the settings, applying batch retouching.
When copying, you can select which effects to sync in batch, click “Save Settings,” and then use Control + V / Command + V to paste the effects to other photos. -
Method 3
You can also save the edited photo’s effects as a new preset, select all photos, and quickly apply this preset to all.